Pages

Thursday, September 13, 2012

Southwestern Pizza

After I made the decision to change to a vegan diet there were certain things I missed a lot and certain things I was glad to have out of my diet. 

One of the things I craved from time to time was pizza! Mainly because I have an obsession with dipping each bite in a heap of ranch dressing. It wasn't the pepperoni, sausage, bacon pizza that I liked, but instead it was the gooey cheese/sauce combination that lured me in to it's tasty trap!

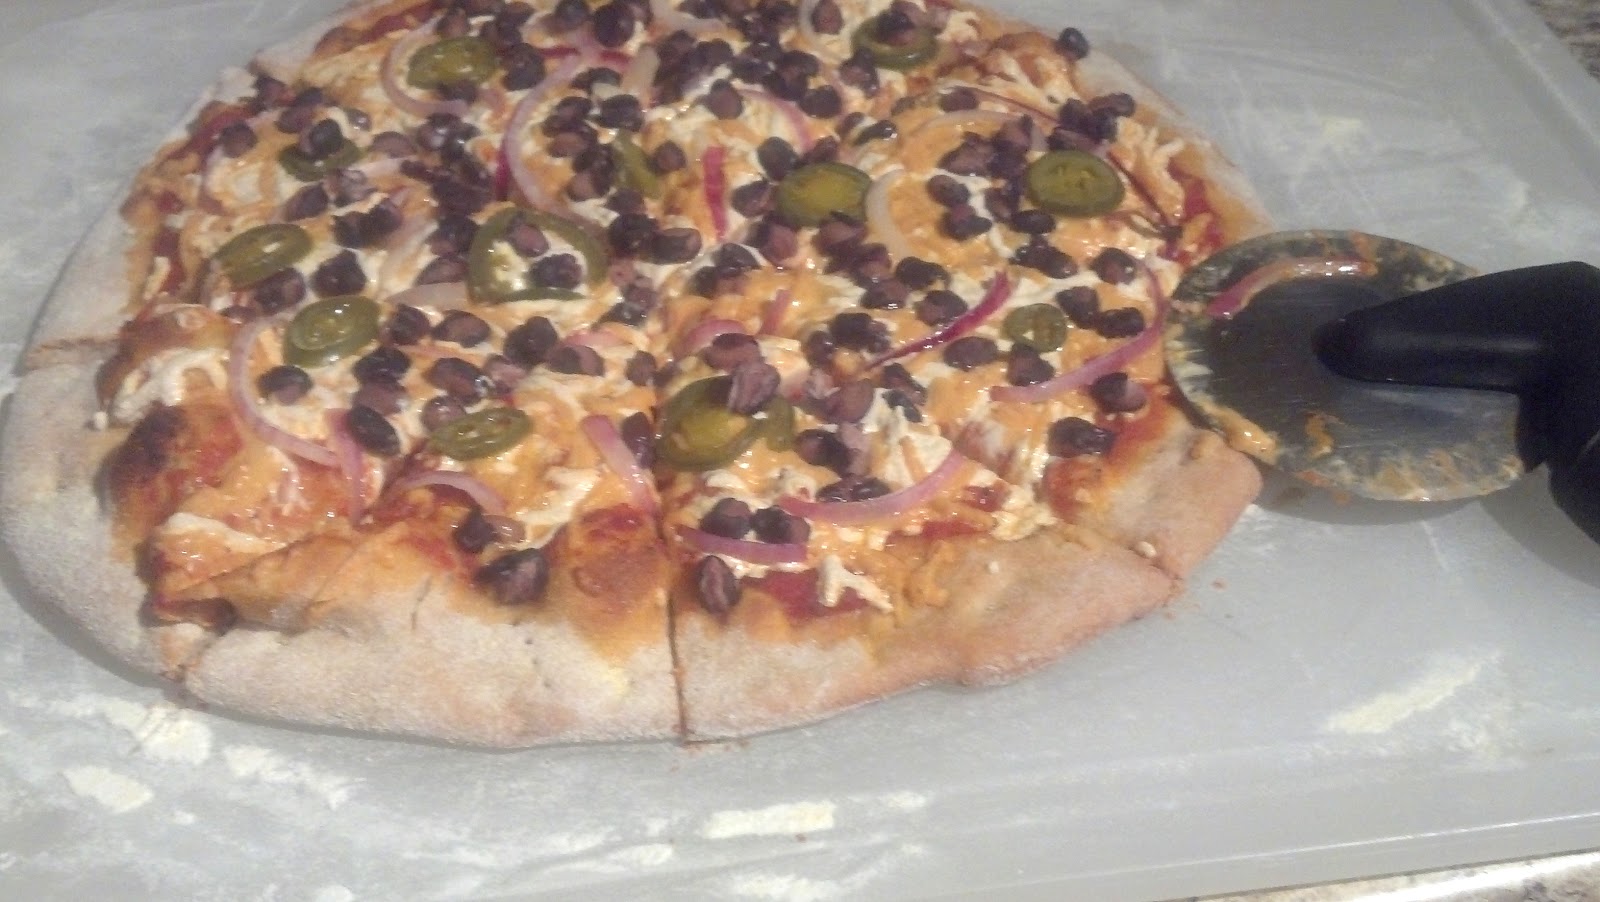
Luckily, with a few vegan swaps I was able to create a delicious pizza that my sister-in-law requests when she comes over. This recipe is for a basic pizza that you can add or omit toppings.  The thing that makes this pizza "Southwestern" is the black beans and jalepenos.

Ingredients
Vegan pre-made pizza dough (I buy the whole wheat dough at my local Fresh & Easy Market)
Pizza sauce (I buy a pre-made sauce from Fresh and Easy also, but you can use a sauce of your choice.)
Daiya cheddar cheese shreds
Daiya mozzarella cheese shreds
1/4  cup thinly sliced red onion
1/4 cup canned black beans (rinsed, drained, towel dried)
1/4 cup jalepeno slices (I use jarred jalepeno slices)
1 Tbs garlic powder
Yellow corn meal
Flour
Cooking spray

Preheat oven to 450 degrees.  **Please read the cooking instructions for your pre-made pizza dough.  Some products may require a higher or lower cooking temperature and more or less cooking time.**


Start by prepping your area for rolling out your dough with a mixture of the corn meal and flour.  Depending on your dough you may use more or less.  Roll out your dough to your desired thickness.  We prefer a rather thin crust--but not a cracker crust.  Our family has a firm opinion about how thin is TOO thin!

Transfer your dough to an ungreased pizza pan.

Spread sauce on the dough but leave a 1-1.5 inch border for a good crust. Next...your toppings!  My systematic way of layering goes sauce, cheese, onion, jalepenons, black beans.  Gently press toppings into cheese.

Finally, lightly spritz the cooking spray around the outside crust of the pizza and sprinkle with garlic powder.  After the pizza bakes you will have a garlic crust!  I was pretty excited when I added this little step.  Delicious.

Pop the pizza into the oven and cook for 8-10 minutes or until the bottom crust is lightly brown and the cheese is nicely melted and slightly golden. **Again, check your package for cooking time.** 

Slice and enjoy! 

Sunday, September 2, 2012

Glorious Golden Vegetable Stock/Broth

This morning I woke with a terrible headache (first one I have had in a few months) and after S left for work I was pleased to see the movie Julie & Julia scroll across our on screen TV show listing.  I put it on right away and decided that today was the day to take my first attempt at creating a wonderfully flavorful vegetable stock. 

I raided my fridge for left over veg that's where it began!

Ingredients
Fresh veg of your choice--Below is what I had on hand:
1 russet potato
1 sweet potato
2 green bell peppers, with seeds and ribs
2 Roma tomatoes, with seeds
1/2 eggplant, with peel
1 cucumber, with peel
1 onion, with skin/paper
1 bunch celery, with leafy tops
1 lb carrots, with peel
1 bay leaf
1 bunch parsley
10 black peppercorns
1 tsp oregano
3 cloves garlic, crushed
1 tsp ground clove
1 tsp dried thyme
1 tsp ground cumin
1 tsp soy sauce
2 Tbs tomato paste
Water

In a large stockpot place all roughly chopped vegetables that you have selected for your stock along with spices (minus soy sauce and tomato paste).  Add enough water to cover and turn burner on high.  Once the water comes to a boil, turn down to a simmer and cover for 90 minutes.


**You may notice that I omitted salt from the recipe and any oil that most people would use for flavor.  I think salt (which I think the soy sauce provides plenty of) is something that should be added sparingly by each person at their own discretion.  I'm not a huge fan of it because of how it reacts inside our bodies.  Though a necessary flavor, there are plenty of ingredients that have the "salt factor" covered.  As for the oil, I don't love adding oil to anything.  I'd rather use healthy natural fats, like avocados and nuts, for instance. Change and adapt this recipe (and others) in a way that makes sense for you and your family!

Add soy sauce and tomato paste, stir gently to break up tomato paste.  Simmer for another 30 minutes, covered, in order to concentrate flavors.

Pull out the larger vegetables (so that when you pour the stock in the strainer the veggies don't splash hot liquid on your face or arms...it hurts!) and strain mixture into a large bowl.

The stock will last for about 2 weeks in the fridge, but if you don't plan on using it right away feel free to separate into smaller containers and freeze!  Just defrost in the fridge a day or two before you are going to need it.

My recipe made enough stock for three of these containers from Ikea which I bought yesterday. Before you store in the fridge or freezer, just make sure to cool enough on the counter so the stock isn't blazing hot--we don't want to grow any fun bacteria! 


I've seen some suggestions on Pinterest where people freeze the stock in ice cube trays.  After the stock is frozen you can break the stock free of it's casing and use as needed.  What a fabulous idea.  I hope you enjoy!

For me it's back to the couch to finish my movie.  Thanks to my sensational DVR I was able to pause when I was outside viewing distance.  Deuce didn't move from the couch.  It's his Sunday too. 


Saturday, September 1, 2012

Eggplant Burger with Tahini Sauce


The name does not boast too much excitement, but just wait until you taste this amazing burger!  There are certain recipes that S will actually either ask for or be confused when I make him something different (usually with meat)--this is one of those recipes. 

One night I actually made these burgers for me and made him a hash with potato, sausage, beef, veg and cheese.  He was confused why he didn't get to have a burger! Life's little successes, I guess. 

The initial idea and base of the recipe came from this original recipe found on another blog. But you know me, I love to change up the ingredients! 

Ingredients
1/2 eggplant sliced 1/4 inch thick
1 small red or medium yellow onion (whatever you have on hand)
1 14 oz. can cannellini beans
1 green bell pepper
1/4 cup chopped fresh parsley
2 Tbsp raw cashews
2 cloves of garlic
2 tsp cumin (I add more sometimes because I love the flavor cumin gives to burgers!)
1/2 cup hummus (I have my own hummus that I make.  So use whatever you have, homemade or store bought.)
1 to 1 1/2 cup panko breadcrumbs
alfalfa sprouts, for topping (optional)
sliced vegan cheese, for topping (optional)

Tahini Sauce Ingredients
2 to 3 heaping Tbs tahini
1/3 cup water
1/4 cup lemon or lime juice (whatever you have on hand)
2 garlic cloves
dash soy sauce

Preheat oven to 450 F.

Place the slices of eggplant on a foil lined baking sheet that has been lightly spritzed with cooking spray.  Roast the eggplant for 10 minutes on one side and 5 minutes on the other side. 

While the eggplant is roasting, saute the onion, bell pepper and garlic until everything is softened.

After the eggplant has finished roasting, turn the oven down to 400 F. 

Into a food processor add the roasted eggplant, sauteed mixture of onions, bell pepper and garlic, beans, parsley, hummus, cashews and cumin. Pulse until just combined. 

Pour into a bowl and stir in the breadcrumbs.  Start with 1 cup and add extra bread crumbs 1/4 cup at a time until the mixture barely starts to pull away from the sides of the bowl. You will need varying amounts of the breadcrumbs each time you make this recipe depending on how much liquid your beans had, how wet your hummus was, humidity, etc. 

Now, using the same pan and foil as before, lightly spritz the foil again with cooking spray, and form anywhere from 5-7 patties.  Make them as large or as small as you like!

Bake for 25-30 minutes, until they start to get crispy and brown on the edges.  Flip and bake for another 25 minutes. 

While the burgers are baking, place all of the tahini sauce ingredients in a small food processor and pulse until combined. 

Take the burgers out of the oven, top with alfalfa sprouts, a slice of vegan cheese (if you like) and the tahini sauce--then eat! Oh, they are so amazing.  I typically will have mine on it's own or on 1/2 a piece of lavash or a whole wheat vegan bun. Add extra veg (tomatoes, pickles, lettuce or whatever) to accommodate your own taste.  I don't like a lot of fuss on my burger...so I'm good with alfalfa sprouts!  Just the right amount of greenage and crunch!

Friday, August 31, 2012

Vegan Crockpot Refried Beans (Oil Free)

Crockpot cooking is not only delightfully easy but with the crockpot liners, cleanup requires throwing away a bag vs. hours of soaking, scrubbing, soaking, etc. I have found these bags in the same section as the foil and zipper lock bags at the grocery store.  Typically, they are next to the oven roasting bags. 

Anyways, I developed this recipe after numerous tries of trying other recipes for vegan refried beans.  This is the best way I have found.  But please add or remove ingredients based on your liking.  I would suggest to you to keep the jalepenos in the recipe, however.  The flavor is amazing and the heat is rather minimal.  My mother cannot tolerate any amount of heat in her food--she even makes a face!  So when I shared this recipe with her, I suggested that she keep the stem on the jalepeno and just split it down the middle.  That way she can remove the jalepeno after the beans have finished cooking.  Though I suspect she removes it earlier then that!  Beans still turned out wonderful and no one ever believes there is no oil, lard, chicken/beef broth.  Ahhh...life's little successes!

These beans last about a week or so in the fridge and one month in the freezer...but why would you have leftovers?  I never do. 

Ingredients
15 oz. bag dried pinto beans, washed and picked over
2 jalepenos, roughly chopped (I leave the seeds in because the heat seems to subside as the beans cook.  The flavor leftover from the peppers is still pretty great!)
1 onion, chopped
3 cloves garlic, smashed and roughly chopped
1 Tbs Italian seasoning or oregano (whatever is already in your pantry)
2 Tbs nutritional yeast
1 Tbs Flax seed

Place the first 5 ingredients in the crockpot (lined with a bag in you have one) and add enough water to just cover beans, plus 2 inches.

Turn the crockpot on high for 2 hours.  Then turn to low for 8 hours.  You may want to check just to make sure that the beans haven't soaked up all of the water.  If the beans look dry and you still have a few hours, stir in 1-2 cups of water. 

After 10 hours (total cooking time), remove any remaining liquid sitting the top of the beans.  Reserve this liquid however until after mashing. 

Now I mash my beans in segments.  Take a few ladles of beans and place them in your storage container of choice.  Mash the beans to your preferred consistency.  Then add more beans, mash, and repeat until all of your beans have been transferred to their resting place and mashed.  At this point, add your nutritional yeast and flax seed.  These two ingredients add depth of flavor without adding salt! Muahahah--down salt demons!

I will set everything up to start at 8:00 p.m. - 9:00 p.m. and it is ready for me in the morning before work!

I like to eat these beans as a snack at work, slathered on a piece of lavash or stuffed in a bell pepper with some sauteed onion, mushroom and kale--but that's a recipe for another day. 

Vegan Portabella, Kale and Sauteed Onion Tofu Scramble

I saw this recipe yesterday on another blog and decided to change it up a little bit to better fit my taste (and available time that I had to cook the meal).  One of my favorite flavor combinations is kale mixed with any type of mushroom sauteed all together with some tahini and onions! This recipe allowed me to crumble in some firm tofu which made the flavors even more exciting. 

I also prefer to use very little to no oil when cooking.  The same goes for my feelings about adding salt to recipes.  Instead of oil I like to keep a measuring cup with a few tablespoons of water to add in when things begin to stick to the pan.  A lot of what makes vegan eating exciting is the natural flavors that come through.  Getting back to tasting our food the way in which it was intended to taste is beyond refreshing. 

Ingredients
1 medium yellow onion, chopped
2-3 Portabella mushroom caps, cubed
1/2 block firm tofu
1 Tbsp tahini
1 tsp soy sauce (This will act as your salt for the recipe.)
2 cloves garlic, minced
1 cup of kale, rinsed, ribs removed and torn into bite size pieces.
1 Tbsp fresh lime juice
1 tsp Sriracha
1/2 cup of water, divided
2 Tbsp raw peanuts for garnish (Optional)

Makes 2-3 servings.

In a large skillet, saute the onion over medium heat until light brown in color (about 7-10 minutes).  Add in minced garlic.  Saute for another minute or so. Remove from pan, place in a bowl for later and let cool. 

Add the chopped cubed mushrooms with 1 tablespoon of water and saute for 2  minutes. 

Add the kale and continue to cook until the kale is wilted and turns a bright green color--about another 5 minutes. Remove from pan and add to the onion mixture.

Next, crumble the tofu into the pan.  You won't need any water right now because the tofu has plenty of water in it.  Cook until tofu starts to look dry (about 5-7 minutes). 

Whisk together the tahini, soy sauce, lime juice and enough water to achieve your perfect consistency. I like mine right in the middle, not too runny and not too thick.  Pour the mixture on top of the tofu and add back in the bowl of onions, mushrooms and kale.  Mix to coat everything with the tahini sauce.

Serve and enjoy.